
Overview of the AJAX StarterKit Security Alarm System
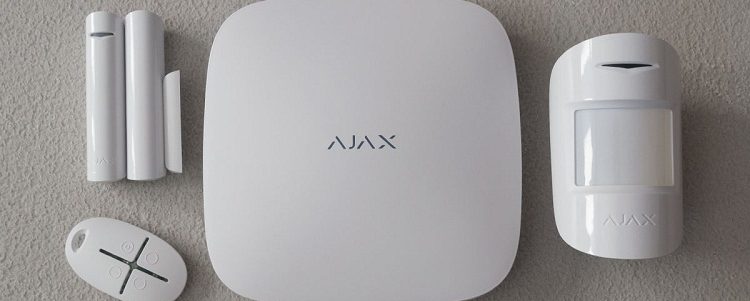
AJAX StarterKit Set
The AJAX StarterKit is a set of minimally required devices for building a reliable security system for a property. The basic kit includes: the central control panel and the “brain” of the system — Ajax Hub, the AJAX MotionProtect wireless motion detector, the AJAX DoorProtect wireless door/window opening detector, and the AJAX SpaceControl key fob for operating the security system.
The package also includes mounting accessories and instruction manuals for all devices. Additionally, all devices come pre-installed with fresh batteries.
The kits are available in two color options: white and black. We received the white version for testing. The box in which the kit was delivered did not leave much of an impression. It was plain white cardboard without branding, logos, or descriptions — only a warehouse sticker on the side.
Inside, we found neatly packed boxes containing the individual devices.
The Brain and Heart of the System — Ajax Hub
We remove the back cover and, following the step-by-step instructions, connect the hub to the power supply and the router. With a green backlight of its logo on the body, it indicates that everything has been set up correctly and that it is ready for operation.
For setup, we need to install the mobile application and register the hub in it. The app can be downloaded directly from the App Store or Google Play by searching for the keywords “Ajax Systems.”
During registration, it is important to provide a real phone number and email address, as you will receive an SMS and an email containing verification codes. The first part of the code is sent via SMS, and the second part is sent by email.
If any part of the code is not received, you can request the codes again by providing a different phone number and/or email address.
After entering the verification codes, the application asks for the hub name (I specified AjaxHome) and its serial number. The serial number is indicated on the device itself under the back cover and is also duplicated on the Ajax Hub packaging box.
All the other detectors in the kit are labeled in the same way — both on the device itself and separately on its packaging. This is a good practice that significantly simplified the system setup.
If you don’t feel like manually entering 20 characters, the serial number can be scanned directly in the app using a QR code, which is also printed on both the device and the box. In general, using QR codes makes registering system devices in the app and on the hub very convenient.
It’s small details like these that shape the overall impression — the manufacturer has clearly thought everything through and taken care to make the user’s life as easy as possible. This approach and attention to detail are truly appealing.
Once the hub is registered, a screen appears displaying all devices connected to the system. It also shows the hub status (“Disarmed”), GSM connection indicator, battery level, access to the settings of each device, a button for adding new detectors, and icons for configuring rooms, notifications, and the key fob.
Now let’s go to the GSM settings and try to determine what the problem is. We check the account balance and see that there are no funds available. The account needs to be topped up.
After adding the subscription fee, the SIM card becomes active and, according to the preconfigured tariff plan, we receive 100 free SMS messages. We check the device status screen — everything looks good.
Now the hub is connected and can send notifications to the specified phone number. However, for this to work, we still need to specify exactly who should receive these alerts.
We open the “Users” menu and initially see only the administrator listed there. If we go into the administrator’s settings, we can see that by default they receive only in-app notifications, while SMS and call notifications are disabled.
For testing purposes, we enable all notification channels for the administrator.
Now let’s add additional users. To do this, you need to specify an email address or select a contact from your contact list. The Ajax application will send an email to the selected user with an invitation to become one of the system users and install the app for further use.
Once the user installs the application and registers in the system (during registration they must use the same email address to which the invitation was sent), you will see in the user list that this contact has been confirmed. You can then configure their notification methods just as we previously did for the administrator.
The user can receive alerts through the same channels as the administrator. The only exception is that alarm phone calls are not available to them.
From their application, the user can view the device status screen, but they do not have access to the settings. Up to 10 users can be added to a single system, while only one can have administrator privileges.
Thus, we have put the hub into working condition, added users, and configured their notification methods for various system events. Now let’s take a look at how to add rooms and assign detectors to them.
First, on the main screen of the application, tap the “Rooms” icon, then select “Add Room.” Enter a name and, if desired, take a photo. After saving the data, you will be able to configure parameters for each room: entry delay time (how many seconds before the alarm is triggered after detection), exit delay time (so you can arm the system while still in the room and have time to leave without triggering it), and partial arming (more on this later).
Wireless Motion Detector — AJAX MotionProtect
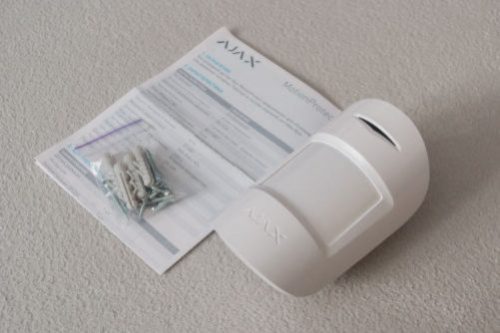
Let’s open the back cover of the motion detector and switch the toggle to the ON position. The detector responds by blinking a green light on the front panel.
In the app, we tap the “Add Device” button and enter the required parameters: name, ID, and the room where it is installed. The ID is printed on both the detector itself and its box. I scanned it using the QR code.
The application informs us that the detector can only be registered in the system at the moment it is powered on, so we need to turn it off and then on again — which we do.
For testing purposes, I installed the motion detector in the protected area called “Living Room.” It’s a проходная room, and I positioned the device so that it also covers part of the corridor. In general, it’s practically impossible to move around the apartment without entering its field of view.
The manufacturer does not disclose all the details of its intelligent signal processing, but states that the detector operates by analyzing the thermal radiation of objects (in the infrared range) and detecting movement. The sensor adapts to the ambient thermal background, identifies warmer objects, and evaluates their temperature and mobility.
Based on a differential analysis of temperature gradients combined with the object’s movement, the system determines whether an intruder is present. The detector’s sensitivity settings (low, medium, high) define the acceptable margin of error during this analysis.
Quote from the detector’s user manual:
High sensitivity level — minimal interference; the detector does not react to objects smaller than a hamster.
Medium sensitivity level — slight interference; the detector does not react to objects the size of a cat or a small dog.
Low sensitivity level — significant interference; the detector does not react to objects the size of a large dog.
Wireless Window/Door Opening Detector — AJAX DoorProtect
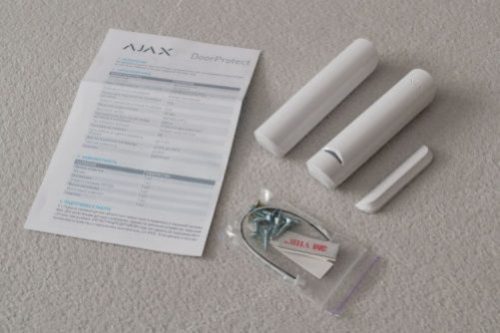
The detector consists of two parts: a magnet (large or small) and the main sensor unit with a reed switch. The manufacturer recommends installing the sensor on the fixed part (the door frame or window frame), and the magnet on the moving part (the door or sash).
Like all detectors of this type, it is triggered when the magnetic contact is broken. The box also includes mounting accessories and an instruction manual.
On the back panel of the detector, there is a socket for connecting an additional wired sensor (for example, if you want to integrate an older detector into the system), a QR code with the serial number, and the SmartBracket mounting panel.
The detector was registered in the system following the same procedure as the motion detector.
Key Fob for Security System Control — AJAX SpaceControl

It is registered in the system in the same way as the detectors. The only difference is that the key fob itself does not have a serial number or QR code, so these must be scanned from the packaging box.
The key fob itself has four buttons: disarm, arm, partial arming, and a panic button. Be careful with the panic button, as it activates the siren mode on the mobile phones of all system users.
The people I tested the system with were, to put it mildly, not thrilled when I triggered it without warning at around half past eleven at night.
In general, all the key fob’s functions are duplicated in a dedicated tab within the application. So you can choose what is more convenient for you — using the app or carrying the key fob.
Installation of the Central Hub and Detectors
I’ll devote just a couple of paragraphs to the installation topic, since in reality everything turned out to be simple and straightforward. More time was spent choosing the locations than on the installation itself.
On the back side of the detectors and the central hub, there is a removable SmartBracket panel with holes for screws. After marking the drilling points using these holes, make two to four holes (depending on the type of detector) and, if necessary, insert the wall plugs included in the mounting kit. Then secure the panels with screws and attach the detectors to them. That’s it. No bundles of wires, cable ducts, or checking connections.
Later, to replace batteries, perform maintenance, or swap a detector, you simply remove it from the panel with an easy motion. At the same time, the built-in tamper protection is triggered, and you receive a notification on your phone that the device’s casing has been opened.
Recommendations for choosing detector locations are provided in the manuals. Each detector has a “Detection Zone Test” mode, so you can experimentally find the position that provides the best coverage. When selecting a location, keep an eye on the signal strength with the central hub, as indoor environments may have issues with shielding or signal reflections.
In the apartment where the system was tested, the maximum range for a detector was about 7 meters through two brick walls. At the same time, the signal strength test showed a drop of only 3–5 decibels. The hub and the motion detector lost connection only when I put the detector in my pocket and carried it outside the apartment. To achieve this, I had to move more than 500 meters away from the building (while it still remained in direct line of sight).
System Testing
The user notification functionality works exactly as the manufacturer promises. Alerts are delivered to registered users through the communication channels selected for each of them by the administrator. Depending on the assigned permissions, users can either simply receive notifications or arm/disarm the system and use the panic button. Adding and configuring detectors and the system itself is available only to the administrator.
Attempts to take control of the system from another smartphone using the serial numbers of the detectors and the hub were unsuccessful. The hub stubbornly refuses to register in another application, stating that it already has an owner. So blurring the serial numbers and QR codes in the photos turned out to be unnecessary — it would not have compromised the security of the system anyway.
It also turned out that even after a complete factory reset of the hub, the administrator data remains intact (only the lists of detectors, zones, and regular users are cleared). In other words, even if the hub is stolen, it cannot be used without the administrator account. However, tracking where it reappears through registration attempts via the manufacturer is quite possible.
The door/window opening detector worked exactly as expected — it signals normally. Opening triggers an alarm, while closing sends a notification. No surprises here: the functionality of reed switch detectors has long been perfected, and this one simply adds a wireless communication channel, while still allowing the connection of a traditional wired detector to integrate it into the Ajax system.
The motion detector proved more interesting. As mentioned earlier, the decision about an intruder is made based on a differential analysis of temperature gradients combined with object movement. The sensitivity settings (low, medium, high) determine the acceptable margin of error.
First, I tried to create the most challenging conditions possible: I turned the air conditioner to heating mode and directed the airflow straight at the detector, taped a piece of tulle to it so it would flutter in the airflow, added an electric heater in the room, and set the detector to maximum sensitivity. After waiting a few minutes, I armed the system and began testing. For half an hour, I remotely changed the air conditioner modes — there were no false alarms. Then I let my smaller dog (a puppy weighing about 7 kg and 25 cm tall) into the protected room, and the alarm triggered immediately. When I entered the room myself, the detector naturally picked me up and sent another alarm signal.
By the way, the alarm signal works as follows: if the Ajax app is running in the background, the phone’s speaker switches to siren mode and starts howling. It’s not extremely loud, but persistent and alarming. It sounds for about 15–30 seconds while vibrating to attract attention. At the same time, SMS and push notifications arrive indicating the type of alarm, the detector name, and the protected zone. The alarm stops automatically after a set time rather than by user action, so if you leave your phone unattended, you might miss it and only notice the messages later.
The administrator also receives an incoming call from the hub’s number, which lasts about a minute and then ends. For maximum reliability, it is still recommended to connect the system to a professional security monitoring service, making it almost impossible to miss an alarm.
Returning to the motion detector: after switching it to medium sensitivity (you need to wait about a minute for the hub, detector, and app to synchronize), I began sending the dogs through the detection zone one by one. The detector never reacted to the smaller dog. With the larger dog (21 kg and about 50 cm tall), the response varied depending on where she was in the room and whether she was lying down or moving. I couldn’t find a clear pattern and estimated the detection probability at roughly 50/50. When I crawled across the room on all fours (75 kg, about 60 cm “at the shoulder”), the detector consistently triggered an alarm.
At low sensitivity, the detector still ignored the smaller dog, and the larger dog could also move freely without triggering alarms. However, it always detected me on all fours, even when I tried moving slowly and wore a winter jacket to reduce body heat radiation. The documentation specifies limits of up to 20 kg and 50 cm for animals. My larger dog slightly exceeds this, but the system appears to have some tolerance. The exact threshold would need to be determined experimentally in each case. Testing on a lighter person wasn’t possible, as my wife refused to crawl around for the sake of science. When she walks upright at 50 kg, the detector still reacts even at low sensitivity.
A possible solution is to restrict pets from rooms with motion detectors while the system is armed, and protect those areas with other types of sensors, such as glass break or door/window opening detectors.
Overall, the system performed exactly as promised by the manufacturer, ensuring 100% detection of intrusion and movement on the premises. Active interference from the air conditioner and heater did not affect performance. An animal close to the specified size limits may occasionally trigger the system at medium sensitivity but not at low sensitivity. The reliable reception range for the motion detector in urban conditions with interference was about 500–600 meters (the detector was tested outdoors).
Conclusions
Disadvantages of the system:
The mobile application is quite power-hungry. My smartphone’s battery saver constantly complains about it and suggests disabling it. Keep this in mind when choosing a phone that will be used to manage the system.
There is no password protection for logging into the app. If your unlocked phone falls into someone else’s hands, they could easily disable your security system. The manufacturer says that password protection will be added in future versions of the app.
There is no option to assign a second system administrator. The manufacturer has also promised to address this soon, and it is already on their roadmap.
The key fob buttons are too easy to press. It’s very easy to accidentally hold down the panic button in your pocket and cause unnecessary alarm or disarm the system. Therefore, I recommend primarily using the smartphone app and keeping the key fob in an easily accessible place at home or in the office specifically as an emergency button.
Now for the advantages, which are far more significant than the inconveniences:
Thoughtful details that make setup comfortable and pleasant: QR codes, well-designed packaging, a pre-installed SIM card, a user-friendly app interface, detailed instructions, and more. These small touches create an overall positive impression of both the product and the manufacturer — you can feel that the user experience has been carefully considered.
Easy setup. Considering that it was my first time handling the AJAX StarterKit and I carefully read the instructions before doing anything, the entire setup took me about 30 minutes. Everything is organized in such a way that the chances of making mistakes are minimal, and you can easily step back at any moment instead of resetting everything and starting over. I believe I could do it again in about 10 minutes.
Simple installation. I needed only basic tools: a drill, a screwdriver, and a hammer. The entire installation, after choosing the locations, took about 15 minutes. The system was already operational during installation, allowing me to monitor signal strength and test the detectors in real time.
Flexibility and reliability in operation. New zones and detectors can be added on the fly. Once properly configured, the system requires virtually no maintenance — apart from occasionally dusting it off and, after about two years, keeping an eye on the battery levels in the detectors. The “partial arming” feature allows you to quickly adjust the protection configuration as needed.
Operational reliability. The system is extremely difficult to suppress or hack using standard methods available to intruders, such as traffic interception, command spoofing, signal jamming, or cutting the power supply.
I would especially like to highlight that just half an hour after receiving the kit, I already had a fully functioning security system in my apartment that notified both me and my family about events. According to the sellers, connecting the system to a professional monitoring service also takes no more than an hour, most of which is spent reviewing and signing the contract.